PDP Exclusives by Rebecca
Showing posts with label Halloween. Show all posts

Sunday, November 4, 2012

Halloween

I spent so much time working on my kid's costumes and I never got around to putting thought into my own until the night before Halloween. I had bought a huge pair of gorgeous red and black wings from Joann last month so I knew I wanted my costume centered around them. I planned to do sort of a dark fairy. On the day of Halloween I opened the wings only to find out that they were cheap pieces of crap. They were super heavy so the elastic straps stretched making then hang weird and then they were only held together by a tiny piece of felt that started ripping when i tried them on. I was pretty pissed off. In the end I just wore a black and purple cape and called it a day. Because I was in a bad mood I feel like my makeup came out bad. Looking back at the pictures I see it looked good but it just was not what I envisioned.
I used my normal foundation with some white powder on top of it to give me a paler look. On my eyes I used Sugarpill Love + and Sugarpill Bulletproof. I did the feathery lines using a cheap NYC liquid liner. My eyelashes are Klean Color. I used Bling Spirit Natural Control glitter adhesive, Bling Spirit glitter in Black Diamond and 8 Bit Cosmetics Glitter in Container for Hearts for the feathery accent lines. I also used Container for Hearts on my eyebrows.


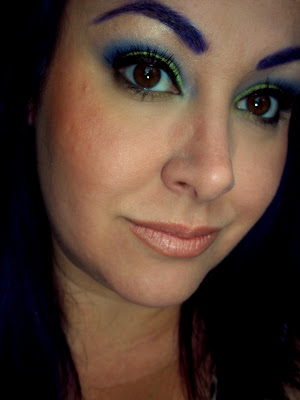
After I got home I washed that makeup off and decided to just do something quick and over the top. I personally would love to wear crazy loud makeup like this everyday. This is also the only picture of my husbands makeup I got of the day! In this pic I used Bling Spirit Natural Control and Bling Spirit Platinum Sparkles on my eyes. My lashes are Klean Color Catty Maria. I used Pretty Addictions Wild Thang for blush and my lips are Ben Nye Pink Tart. My husband is wearing all Halloween cream makeup.


I did minor makeup on all my kids and failed to take pictures of course. I did snap this one of the mermaid makeup I did on my middle daughter. I used Pretty Addictions Shipwrecked in Paradise collection as well as Shattered Pearls. I also used some lash glue and applied some jewels to her cheeks and her eyebrows are Bling Spirit in Pacific Blue.


Next year we are are all forgoing the glam and going for guts and gore. We are going to be a family of disgusting zombies. I am going to RAID the Ben Nye section here!! 

If you have links to your Halloween look comment below so I can check it out!!

 Thanks for reading,
Photobucket

Sunday, October 28, 2012

Creeper

This makes me laugh. My bust up, uncontrollable laugh. I envisioned a look and believe me, this was NOT it. I intended to have smooth white skin, no eyebrows with just red lined eyes but the eyebrows were harder to conceal than I planned and I did not use a primer before applying the white makeup so instead I was left with this. I improvised and came up with this. A scary who knows what. I sort of feel like the evil witch from Snow White LOL. Anyhow, I took some pics of how I did this look. I am not going to call it a tutorial because I am not 100% happy with this.

First I tried to conceal my brows. I applied a non toxic glue stick back and forth on my brows and smoothed them with my finger. Then I applied a translucent powder to set them. I repeated this set and then using a small spatula I applied a generous amount of glue stick to my brows patting it down. Once again I set with powder. After that I used a concealer brush and patted white face makeup on top of my brows. Powdered again and then applied a thicker layer of concealer.

After that I applied the white cream Halloween makeup to my entire face using a damp makeup sponge. I dabbed it on being careful not to drag the sponge. After applying I powdered my entire face using translucent powder.
I did another layer of white cream makeup and powder. My eyebrows were starting to crack =0(
Then I used some black eyeshadow and a big fluffy face brush to apply some shading all around my hair line , jaw and chin. I used Sugarpill Bulletproof and Real Techniques Powder Brush.

Next I applied some red to my waterline and tightline using a small eyeliner brush. I did not have a red eyeliner so I used Sugarpill Love+ .

I also added a little bit of purple underneath my eye and in the tear duct area using a fluffy eyeshadow brush. I used Sugarpill Poison Plum.

Then I added in some details. I did the cracks using an eyeliner pen. The cracks are really easy to achieve. Just start with a long line and start branching out. The key is to use short, light strokes. I also added some black to my lips. I used a fluffy face brush, opened my mouth and applied the black eyeshadow to the inner area.

Here is the finished eye.

To make the gross teeth I just used some cheap lipstick. Using a small spatula I scraped some lipstick from the tube and smashed it all over my teeth. It stayed for HOURS and looked quite gross.

Creeper <3

 Thanks for reading,
Photobucket

Thursday, October 25, 2012

Here Kitty, Kitty, Kitty - Halloween look and tutorial

 I have been having way too much fun raiding my Halloween bin of costumes and makeup! This look came out super cute. It could be a bit cleaner but overall I am happy with it! Check out how to achieve this look below.

You will need:
Foundation
Eyeshadow Primer and Base ( I used Too Faced Shadow Insurance and NYX Jumbo Pencil in Milk)
Black Eyeshadow ( I used Ben Nye Black)
Gray Eyeshadow  ( I used Ben Nye Graphite)
White Eyeshadow ( I used Sugarpill Tako)
Black Eyeliner ( I used three different kinds of liner. I used Pur Minerals Black Gel Liner, Jordana Fabuliner Black Eyeliner Pen and Lorac Kohl Eyeliner)
A variety of brushes such as fluffy blending brush, eyeshadow brush, angled liner brush, small liner brush, fluffy blush brush and a small flat brush.
Red lipstick or lip pencil (I used NYX Jumbo lip pencil)
Fake Lashes

 1.  Apply your foundation. Prime and add a base to your eye. Then using your fluffy brush apply the white eyeshadow to your inner eye. Apply it in your tear duct area and a third of the way over. Using the same brush apply the gray eyeshadow to the middle third of your eye. Then, using a piece of paper or tape, hold it to your eye and apply the black eyeshadow. Using the paper or tape will create a nice, sharp clean edge. After you have done that, using your fluffy brush, reapply the white overlapping into the gray to blend, then apply the gray slightly overlapping into the white and black to blend. Very carefully add more black to blend and get the desired color depth. After you have finished that, use your fluffy brush or your finger and blend out the top edge of the makeup. Take care not to ruin the crisp line on the outer edge.

2. Using your desired liner, line your eye making a dramatic wing on the outer edge. The bigger the better! I used my eyeliner pen to do the top liner and outer wing. Then I used my kohl eyeliner for the inner line and lower liner. To get the little point on the inner eye I used an angled liner brush to pull the liner down a little. I also used gel liner to line my tightline and fill in all the space between my lashes.

3.  Using your gray shadow and a blush or face brush contour your face. Then apply the gray to your cheekbones, down the bridge of your nose and to your forehead. Blend out the gray heavily. Next apply white eyeshadow in a circular shape just under your nose. You will want to make sure you use a quality white eyeshadow. Apply the shadow in layers until it is opaque. Then using black liner ( i used my gel liner and an angled liner brush) apply to the lower part of your nose. Then trace the liner down to your lip and line the top edge of your top lip. Carefully follow the edge of your lips out and line the lower edge of the circular shape making a cat "smile". Fill your lips in with the liner.

4.  Using the gray eyeshadow and a small eyeliner brush ,line the white circular shape. Apply this very lightly!! Then using your eyeliner ( I used my eyeliner pen) draw 3 small dots in the middle of the white circular areas.  Then draw your whiskers on. You can draw them as big or small as you like. I ALWAYS mess up when I do whiskers and never get them straight so I opted for tiny whiskers. Next apply red lipstick or liner to your bottom lip only. Lastly fill in your brows using a black pencil and add lashes!

I hope this was helpful! If you end up doing this look please let me know how it came out!!
 Thanks for reading,
Photobucket

Monday, October 22, 2012

Bruised and Bloodied - Halloween Look and Tutorial

   Please be kind, this is my first time doing bruising. Overall I am pretty pleased with how it came out. It could be a bit more realistic but I only used cosmetic makeup. I did not want to use Halloween/Theatrical makeup because I know most people do not have it laying around. This look can be achieved using standard everyday makeup!


I used my Sugarpill Burning Heart Palette and the green from my Sugarpill Sweetheart palette along with a red NYX Jumbo Lip Pencil, Purlisse lip treatment, Ulta foundation, a fluffy Studio Tools brush, a Studio Tools angled liner brush and an elf concealer brush.
You will need:
Matte Red Eyeshadow
Matte Green ( a dirty green would work better than the green I used) Eyeshadow
Matte Yellow Eyeshadow
Matte Purple Eyeshadow
Red Lipgloss or Red Lipstick
Fluffy eyeshadow brush
Small brush such as a liner brush
Foundation


1. I started out by applying my foundation. This is an important step because the foundation gives something for the eyeshadow to stick too. I also did my eyebrows and mascara. This is optional.


2.  Next I applied the yellow eyeshadow in the general shape I wanted the bruising to be. You do not have to be precise or careful. Bruising isn't an exact shape or look so do not worry about keeping in the shape or exact shading at this point. We have to build up color. Another tip is to start light. Only pick up a small amount of shadow on your brush. Keep getting a little more on your brush and applying until you have your desire color.

 3. Apply the green shadow with the same brush on top of the yellow in a slightly smaller shape.

4. Using the small brush or eyeliner brush apply the purple along the lower and upper lash line. The grab your fluffy brush and go over the purple until it is very blended


5. Using the fluffy brush add a small amount of purple under your eye and to your lid and slightly into the crease. Blend it heavily into the yellow and green.

6. Using the same brush add red on top of the purple. Apply the red VERY lightly ans build up the color. Blend it out heavily.

7. Take your fluffy brush and apply yellow all over the entire eye blending it as you go. This changes the red color into more of a bruise color.

8. Lastly I applied a bit more purple to my lid and under eye. Then using my red lip pencil I added a little under my lower lash line. Then I added a bit more yellow, red and purple where it was needed. I wish I could be more specific but like I said, bruising is not standard so I just added color where I felt it needed it.


To do the mouth I used the same technique of layering colors, starting with yellow, then green, then purple, then red and then going over with the colors again as needed until the shading was correct. I applied the yellow first and then I colored a small spot in the corner of my mouth in with the red lip pencil.
 I did not have any red gloss so I mixed some of my red lip pencil with a lip gloss/balm. You do not want to use anything with sparkle or shimmer. If you do not have any gloss you can mix red pigment or lipstick with chapstick by cutting off a small chunk and smashing together. Vaseline will work as well.

 I used the small eyeliner brush and dabbed the mixture on starting on the inside of my lip. I gradually moved outwards. You will want to pick up a lot on your brush so when you dab it on it gives it some texture. I also used my finger to dab it as well.

The nose was done the same way, layering the colors. Then I used the small brush and applied the red mixture to my nostril and used my finger to dab it out onto my nose.

Here is the finished look. There are some things I would change about it. I would line my other eye slightly with red so it would appear that I had been crying or it was irritated. I would also try to deepen the color of the blood. Overall I am pleased an how well this came out especially since it was my first time and I only used eyeshadow and lipstick. Doing this look made made me want to try out some special effects stuff. After the holidays I am going to get a bunch of Ben Nye stuff and go to town!


Let me know if you found this tutorial helpful or if you have any tips for me! Thanks for reading!

Wednesday, October 17, 2012

More Halloween Colors!


Photobucket
Too Faced Shadow Insurance
NYX Jumbo Pencil In Milk
Billion Dollar Brows Duo Pencil
Klean Color Purple Eyeliner on Brows
Sugarpill Poison Plum on Brows
Jordana Fabuliner
Pur Minerals Gel Liner
Sephora Mascara
Sugarpill Flamepoint
Sugarpill Bulletproof
Sugarpill Poison Plum


Photobucket
Ulta Extreme Wear Matte Mousse Foundation
MAC Soft Sand Bronzer
MAC Forever Marilyn Beauty Powder
Benefit Porefessional
Pretty Addictions The Big O Blush
MAC Cusp of Dawn and Lime Crime Coquette mix on lips


 Thanks for reading,
Photobucket

Tuesday, October 9, 2012

Halloween Inspired Look and Tutorial using BFTE


 For this look you will need-
Primer ( I used Too Faced Shadow Insurance)
Base ( I used NYX Jumbo Pencil in Milk)
 Bright Green/Chartreuse PigmentShadow( I used BFTE Lavish)
 Blue Based Purple Pigment/Shadow ( I used BFTE Panurple)
  Deep Purple Shadow/Pigment ( I used BFTE Big Ego)

I have to apologize for the brightness of these photos. I was losing daylight FAST and had to use flash which I hate!


Step 1.  Apply your primer and eyeshadow base.


Step 2. Apply Lavish all over your lid stopping right below your crease.

Step 3.  Apply Panurple into your crease and bring it up slightly.

 Step 4.  Apply Big Ego directly to your crease. Apply liberally until the crease area is a deep in color.

Step 5. Using a fluffy blending brush reapply Lavish to the lid, Big Ego to the crease and Panurple above the crease.

Step 6.  Using a fluffy brush or your finger gently blend out the top and side edges.


Step 7. Finish up with liner and mascara!


 Thanks for reading,
Photobucket